You have just taken delivery of a new automatic canvas stretching machine. The crates are unpacked, the machine is mounted to your workbench, and your team is eager to start producing. But without a clear standard operating procedure (SOP), what happens next?
One operator stretches canvases too tightly, causing the frame to warp. Another uses excessive air pressure, damaging the canvas weave. A third forgets to check the air supply before starting, leading to inconsistent tension across the batch. These variations are not the result of carelessness—they are the natural consequence of operating complex equipment without standardized procedures.
An SOP for canvas stretching machines is not merely a document for regulatory compliance. It is a tool for consistency, safety, and efficiency.
This guide provides a framework for developing and implementing standard operating procedures that cover every stage of canvas stretching machine operation—from setup and daily inspection to stretching techniques, safety protocols, and maintenance.
The craft of canvas stretching hinges on how to tighten a canvas, a technique refined through precision stretching. Manual stretching requires years of training to master; according to one patent description, the placing of a canvas onto a framework is generally done by an artisan trained for several years in the practice.
Automatic machines replace manual functions, but they do not eliminate the need for skilled operation. Standard operating procedures bridge the gap between machine capability and operator execution. They ensure that:
Tension is consistent across all canvases, regardless of which operator is running the machine
Safety protocols are followed to prevent injury from powerful pneumatic components
Machine longevity is maximized through proper maintenance and operation
Quality standards are met for every production batch
For shop owners, SOPs also enable the implementation of standard stretching procedures across shifts and operators. When every operator follows the same sequence of steps, quality variation diminishes and training time decreases.
Upon receiving a canvas stretching machine, proper unpacking and setup establish the foundation for safe operation.
A typical canvas stretching machine ships with components including: the main stretching machine, foot pedal assembly, pneumatic staple gun, instruction manual, safety glasses, and mounting hardware. The machine is partially assembled and ready to operate out of the box; the foot pedal assembly will need to be plugged into the stretching machine and the air compressor.
Bench mounting: Most machines are designed to be mounted in front of a typical workbench. A universal mount attaches to the front of the workbench, positioning the machine at the correct height for comfortable operation. Ensure the mount is securely fastened before proceeding.
Air supply connection: The machine operates on compressed air. Before connecting, verify that the air compressor can supply the required pressure. Most machines require a minimum supply air pressure of 90 psi. The tubes are color-coded for easy connection.
Before starting production each day, operators should perform a brief inspection:
Check for damaged, loose, or broken fittings or tubing
Inspect the staple gun for proper operation and sufficient staples
Verify air pressure at the regulator (typically 90–120 psi supply)
Test the foot pedal to ensure responsive operation
Examine the clamping bar and stretching plates for debris or damage
Ensure the work area is clean and free of obstructions
For production environments handling multiple material types—from canvas to paperboard—understanding standardized material handling procedures is essential. Explore the capabilities of automated stretching and material handling equipment for the automatic frame stretching machine.
The following step-by-step procedure provides a foundation for consistent canvas stretching. Operators should adapt these steps to their specific machine model and production requirements.
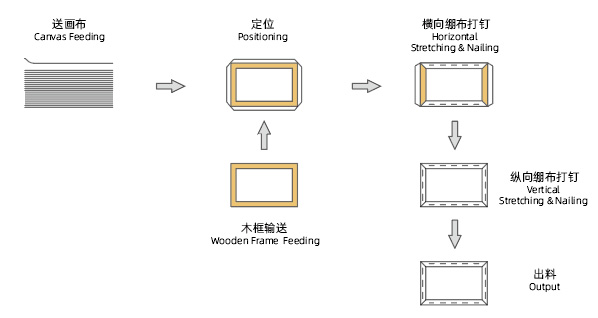
Lay the artwork or canvas face down on a clean work surface behind the machine
Ensure the canvas has sufficient excess material: minimum 1.5 inches past the bottom of the stretcher bar, and no more than 2.5 inches
Position the stretcher frame on the canvas, centering it with the image or desired placement
For a gallery wrap, fold the canvas so that approximately 1/16 inch of the image extends over the radius
Place the canvas and frame, ready to be stretched, into the machine
Move the left-hand stretching arm until it touches the frame
Use the pneumatic brake to lock the arm in place
Place the canvas between the grippers on both sides of the machine
Ensure there is always some canvas left in the grippers to achieve the perfect stretch
Pressure guidelines: Start the stretch at low pressure and increase gradually. The pressure gauge on the machine indicates regulated air pressure to the stretching plates. It is safe practice to always start a stretch at around 15–20 psi and increase it slowly. The stretching pressure should be no more than 15–20 psi to start a stretch; increase the pressure slowly and let the frame rise no more than 3–4 inches.
Activate the CLAMP switch to secure the canvas
Activate the STRETCH switch to apply tension
Observe the canvas tension; increase pressure gradually if needed
The operating pressure of the clamping bar is internally preset; ensure the clamp and stretcher bar move slowly
Important: The clamping bar has a dedicated pressure regulator set to a point that will not exceed the stretcher bar pressure by more than 10 psi. This ensures that the canvas is permitted to slip just enough to minimize overstretching.
Once the desired tension is achieved, press the staple switch to release staples
For the first side, use the Inner Staples switch
After stapling, release the stretch by stepping on the stretching pedal
Depress the clamping foot pedal again to open the clamp and remove the artwork
Fold the corners of the canvas
Insert the frame back into the machine, repeating the clamping and stretching steps for the opposite side
For the second and subsequent sides, use both the Inner Staple and Outer Staple switches simultaneously
Continue this process for the third and fourth sides
Remove the finished stretched canvas from the machine
Inspect for proper tension (a properly stretched canvas should feel firm and produce a slight drum sound when tapped lightly)
Check corners for clean folding
Verify staple placement and spacing
Tip: Allow the canvas to stretch gradually; do not be in a hurry to fasten the staples. Working from the center outward and pulling the canvas diagonally across the frame can result in a more even stretch.
Canvas stretching machines use pneumatic power that can cause serious injury if not operated with care. Safety protocols must be part of every operator's routine.
Always wear safety glasses when operating the machine
Keep hands and fingers clear of the clamping area at all times. The clamp and stretcher bar move slowly but are deceptively powerful—the force behind them can damage your fingers
Do not place your fingers between the clamping bar and front plate at any time
Never bypass or disable safety guards or interlocks
Ensure the work area is clear of bystanders during the operation
Before applying air to the machine, adjust the regulator on your compressor to produce the recommended pressure
If using a pneumatic staple gun, provide what the manufacturer recommends; this may require a two-way manifold from your compressor
Do not exceed maximum supply air pressure (typically 120 psi)
Monitor pressure gauges regularly for signs of malfunction
Know the location of the emergency stop (if equipped)
Understand how to release pressure from the system quickly
Keep a first aid kit accessible in the work area
Report any injuries immediately, no matter how minor
Safety and quality protocols share common principles across different types of automated production equipment. For a broader view of how standardized procedures apply across manufacturing lines, explore the automatic frame stretching machine equipment.
Regular maintenance extends machine life and prevents unexpected downtime.
Clean the machine after each shift: remove dust, canvas fibers, and debris
Inspect the staple gun for jams or misfeeds
Check the air lines for leaks or damage
Verify pressure settings are within specification
Lubricate moving parts according to manufacturer recommendations
Inspect clamping surfaces for wear or damage
Check all fasteners for tightness
Test all foot pedal and switch functions
Inspect hydraulic or pneumatic lines for leaks
Check electrical circuits for aging or damage
Examine the machine frame for structural deformation
Replace worn components before they fail
Keep the working environment clean and orderly to avoid the accumulation of debris that affects the operation
Before carrying out maintenance, switch off the main switch and lock it; disconnect all sources of power from the machine
To remove dust or particles, never use compressed air—only use rags and aspirators
Follow the instruction manual for specific maintenance procedures
| Issue | Possible Cause | Corrective Action |
|---|---|---|
| Inconsistent tension | Air pressure fluctuation; worn clamp | Check regulator; inspect clamp surface |
| Canvas slips during stretch | Insufficient clamping pressure | Verify clamp pressure; clean clamp surfaces |
| Staple jams | Improper staple size; low air pressure | Use correct staples; check air supply |
| Uneven stretch | Canvas not centered; uneven clamping | Reposition canvas; verify clamp alignment |
| Frame warping | Excessive tension | Reduce stretching pressure |
| Canvas tearing | Too much pressure too quickly | Start at 15–20 psi; increase slowly |
Profile: A custom framing studio with three operators and one semi-automatic canvas stretching machine. Previously, each operator used their own stretching technique, resulting in inconsistent quality.
Challenge: Operators stretch canvases differently—some use more pressure, some less. Quality complaints from artists about uneven tension are increasing.
Solution: Implement a written SOP covering all steps from pre-operation inspection to final quality check. Post the SOP near the machine. Train all operators on the standard procedure. Conduct quality audits weekly.
Result: Tension consistency improves. Quality complaints decrease. New operators can be trained in half the time it took previously.
Profile: A commercial canvas manufacturer produces over 50,000 stretched canvases annually using multiple automatic machines across two shifts.
Challenge: Machines require frequent maintenance due to heavy use. Downtime between shifts is unpredictable. Quality varies between shifts.
Solution: Develop a comprehensive SOP that includes shift-change checklists, daily maintenance logs, and quality verification steps. Assign maintenance responsibilities to specific operators. Implement a preventive maintenance schedule.
Result: Machine downtime decreases by 40%. Quality consistency between shifts improves significantly.
Once you have established standard operating procedures for your canvas stretching machine, the next logical step is optimizing those procedures for your specific production mix. Different canvas types—cotton, linen, polyester—require different tension settings. Different frame sizes demand different clamping positions. Different production volumes may justify automation upgrades or additional equipment. Reviewing your SOP regularly and refining it based on production data will help you achieve consistent quality, maximize equipment life, and reduce operator training time.
To continue building your production equipment knowledge, the following topics complement this guide:
What Is an Automatic Frame Stretching Machine? Full Working Principle Guide
Semi-Automatic vs Fully Automatic Canvas Stretchers: Which One Fits Your Production Volume?
Common Canvas Stretching Defects and How to Prevent Them
Maintenance and Troubleshooting Guide for Canvas Stretching Machines
From Hand Stretching to Automation: A Cost-Benefit Analysis

 English
 Español
 Português